How to Mount Wyze Solar Panel for Maximum Sunlight Exposure


How to Mount Wyze Solar Panel for Optimal Sunlight Exposure
Harnessing the power of the sun to keep your Wyze cameras charged and operational is simple with the Wyze Solar Panel. Proper mounting and positioning are key to maximizing sunlight exposure and ensuring your cameras stay powered longer without frequent recharging.Compatible Wyze Products for Solar Panel Mounting
Wyze Cam Outdoor & Wyze Battery Cam Pro (Solar Panel Compatible)
The Wyze Solar Panel is designed specifically to work with Wyze Cam Outdoor v1/v2 and Wyze Battery Cam Pro. These cameras benefit from extended battery life by continuously charging via solar energy.Note: The Wyze Solar Panel is not compatible with Wyze Cam v3, Wyze Cam v4, Wyze Cam Pan, or other Wyze cameras.
Wyze Bird Feeder Plug-in Cam v4 Bundle
For birdwatching enthusiasts, the Wyze Bird Feeder Plug-in Cam v4 Bundle offers a unique way to monitor feathered visitors. This bundle includes the Wyze Bird Feeder, Wyze Cam v4, and Wyze Outdoor Power Adapter. While the Wyze Cam v4 itself is not compatible with the solar panel, the bundle supports easy installation and multiple mounting options, including wall, tree, pole, cord, and suction cup mounts.Wyze Cam v4
The Wyze Cam v4 is a versatile indoor/outdoor camera with multiple mounting options such as stand, wall mount, ceiling mount, and magnetic wall mount. However, it does not support charging via the Wyze Solar Panel. It requires a standard power adapter for continuous power.Wyze Cam Floodlight Plug-In Mount
The Wyze Cam Floodlight Plug-In Mount is an accessory designed for Wyze Cam Floodlight models, providing a simple plug-and-play mounting solution with a 20-foot power cord. This product is unrelated to solar charging but offers convenient outdoor lighting and security.Step-by-Step Guide to Mounting Your Wyze Solar Panel for Optimal Sunlight
1. Choose the Best Location
Find an area with the most direct sunlight throughout the day. Ideally, select a spot free from shade caused by trees, buildings, or other obstructions. Point the solar panel south if you are in the Northern Hemisphere, or north if you are in the Southern Hemisphere. This orientation maximizes sun exposure.2. Mounting the Solar Panel
- Use the wall mount base included in the Wyze Solar Panel package.
- Position the base where you want to install the panel and mark the screw holes with a pencil.
- For drywall or soft surfaces, drill pilot holes and insert drywall anchors.
- For wood or harder surfaces, directly screw the mount base into place.
- Attach the universal joint to the back of the solar panel and secure it with the locking screw cap and hexalobular socket nut.
- Connect the solar panel to the wall mount base by screwing the locking screw cap until secure.
3. Adjusting the Angle
- The solar panel can be tilted up to 90° vertically at the elbow joint.
- Loosen the locking screw cap to adjust the angle and then tighten it firmly after positioning.
- Recommended tilt angle: Approximately 30° upward to capture optimal sunlight.
4. Cable Management and Connection
- Use the winding board on the back of the solar panel to coil any excess cable neatly.
- Connect the microUSB cable from the solar panel into the waterproof sleeve of the power adapter.
- For Wyze Cam Outdoor, use the included adapter.
- For Wyze Battery Cam Pro, a separate Wyze Solar Panel USB-C Adapter Cable is required (sold separately).
- Remove the silicone cover from the camera’s charging port and insert the power adapter securely.
5. Final Setup
- Mount your Wyze Cam Outdoor or Battery Cam Pro in the desired location.
- Ensure the solar panel is positioned to receive maximum sunlight throughout the day.
Tip: Regularly check and clean the solar panel surface to maintain charging efficiency.
Important Mounting Tips for Optimal Performance
- The solar panel requires direct sunlight to charge effectively and will not charge during nighttime or heavy cloud cover.
- It may still work in cloudy weather but with reduced efficiency.
- The solar panel will stop charging once the camera battery reaches 100% and resume charging when the battery drops below 90%.
Product Highlights
Wyze Solar Panel Kit Includes:
- Wyze Solar Panel with 360º freestyle mount
- Wall Mount Base with screws and anchors
- Universal Joint and Locking Screw Cap for angle adjustment
- 13-foot weatherproof power cable
- Quick Start Guide for easy installation
Wyze Cam Outdoor & Battery Cam Pro Features:
- Weather-resistant design for outdoor use
- Long battery life extended by solar charging
- Easy mounting options for walls, poles, or trees
- Compatible with Wyze Solar Panel for continuous power
Visual Inspiration for Mounting Wyze Solar Panel
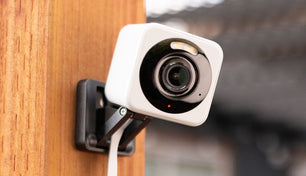 Wyze Cam Outdoor mounted outdoors, ideal for solar panel charging
 Outdoor lifestyle with Wyze Cam Floodlight for enhanced security
 Simple setup and mounting for Wyze outdoor devices
Summary
Mounting your Wyze Solar Panel correctly is essential to maximize sunlight exposure and keep your Wyze Cam Outdoor or Battery Cam Pro powered longer. Choose a sunny location, mount securely with the included hardware, adjust the angle for optimal sun capture, and manage cables neatly. Remember, the solar panel is compatible only with specific Wyze cameras designed for outdoor use and solar charging. By following these guidelines, you can enjoy continuous outdoor monitoring without the hassle of frequent battery recharging.| Feature | Bird Feeder Plug-in Cam v4 Bundle | Wyze Cam v4 | Wyze Cam Floodlight Plug-In Mount |
|---|---|---|---|
| Included Items | Wyze Bird Feeder, Wyze Cam v4, Wyze Outdoor Power Adapter | Wyze Cam v4 | 1x Wyze Cam Floodlight Plug-in Mount, mounting kits, foam tape, quick start guide |
| Price | $89.98 | $35.98 - $100 (varies by variant) | $19.98 |
| Bird Feeder Color Options | Blue, Brown (both sold out/unavailable) | N/A | N/A |
| Camera Resolution | Wyze Cam v4: 2.5K QHD | 2.5K QHD | N/A |
| Night Vision | Enhanced Color Night Vision | Enhanced Color Night Vision | N/A |
| Weather Resistance | Bird Feeder: Weather-resistant polycarbonate | IP65 rated | Outdoor safe |
| Mounting Options | Wall, tree, pole, cord, suction cup | Stand, wall mount, ceiling mount, magnetic wall mount | Plug-in mount with mounting kit |
| Power Source | Plug-in (includes Outdoor Power Adapter) | Wired (requires power adapter for outdoor use) | 110-120V AC input |
| Compatibility | Compatible with Wyze Cams (Battery Cam Pro, Cam v3/v4, Outdoor v1/v2) | Works with Alexa, Google Assistant, IFTTT | Compatible with Wyze Cam Floodlight v1, v2, Floodlight Pro |
| Special Features | Macro Lens Adapter included, live stream & notifications | Motion-activated spotlight, 24/7 local recording, Wi-Fi 6 support, AI auto-zoom, smoke & CO alerts | Easy plug-n-play floodlight solution, no junction box needed |
| Dimensions/Weight | Not specified | 2in x 2in x 2 3/8in, 0.49 lb (222 g) | Package dimension: 153mm x 155mm x 79mm, weight 1.39 lbs |
| Warranty | 30-day hassle-free returns | 1-Year | Not specified |
| Additional Notes | No squirrel defense system | Requires microSD card and outdoor power adapter for outdoor use | Power cord length: 20 ft (6m), rated for outdoor use |
Which Wyze cameras are compatible with the Wyze Solar Panel?
The Wyze Solar Panel is compatible with Wyze Cam Outdoor v1/v2 and Wyze Battery Cam Pro. It is not compatible with Wyze Cam v3, Wyze Cam v4, Wyze Cam Pan, or other Wyze cameras.Can I use the Wyze Solar Panel with Wyze Cam v4 or Wyze Cam Floodlight?
No, the Wyze Solar Panel is not compatible with Wyze Cam v4 or Wyze Cam Floodlight. Wyze Cam v4 requires a standard power adapter, and the Floodlight uses a plug-in mount with a power cord.How do I mount the Wyze Solar Panel for optimal sunlight exposure?
To mount the Wyze Solar Panel for optimal sunlight, choose a location with direct sunlight throughout the day, free from shade. In the Northern Hemisphere, point the panel south; in the Southern Hemisphere, point it north. Use the included wall mount base and hardware, and adjust the tilt angle to about 30° upward for best results.What is the recommended angle for the Wyze Solar Panel?
The recommended tilt angle for the Wyze Solar Panel is approximately 30° upward. The panel can be adjusted up to 90° vertically at the elbow joint for optimal sun exposure.How do I connect the Wyze Solar Panel to my camera?
Use the included 13-foot weatherproof power cable to connect the solar panel to your camera. For Wyze Cam Outdoor, use the included adapter. For Wyze Battery Cam Pro, a separate Wyze Solar Panel USB-C Adapter Cable is required (sold separately). Remove the silicone cover from the camera’s charging port and insert the power adapter securely.Does the Wyze Solar Panel work in cloudy weather or at night?
The Wyze Solar Panel requires direct sunlight to charge effectively. It may still work in cloudy weather but with reduced efficiency. The panel does not charge at night or during heavy cloud cover.Will the Wyze Solar Panel overcharge my camera battery?
No, the Wyze Solar Panel will stop charging once the camera battery reaches 100% and will resume charging when the battery drops below 90%.What is included in the Wyze Solar Panel kit?
The Wyze Solar Panel kit includes the solar panel with a 360º freestyle mount, wall mount base with screws and anchors, universal joint and locking screw cap for angle adjustment, a 13-foot weatherproof power cable, and a Quick Start Guide.How should I manage the excess cable when installing the Wyze Solar Panel?
Use the winding board on the back of the Wyze Solar Panel to coil any excess cable neatly. This helps keep your installation tidy and protects the cable from damage.How can I maintain the efficiency of my Wyze Solar Panel?
To maintain charging efficiency, regularly check and clean the surface of your Wyze Solar Panel to remove dust, dirt, or debris that may block sunlight.What are the best locations to mount the Wyze Solar Panel for optimal sunlight?Can you explain the cable management process for the Wyze Solar Panel?How do I adjust the angle of the Wyze Solar Panel after mounting it?
Shop smarter, powered by Big Sur AI